Manifest form
1. A printed manifest is your confirmation to us of the items we are collecting from you. When you print a manifest and hand it to our driver, he will check the manifest against the physical items he is collecting. Ensure that he signs a copy for your records. If there is a difference between what is on the manifest and the physical items to be collected, you and the driver can together decide what to do.
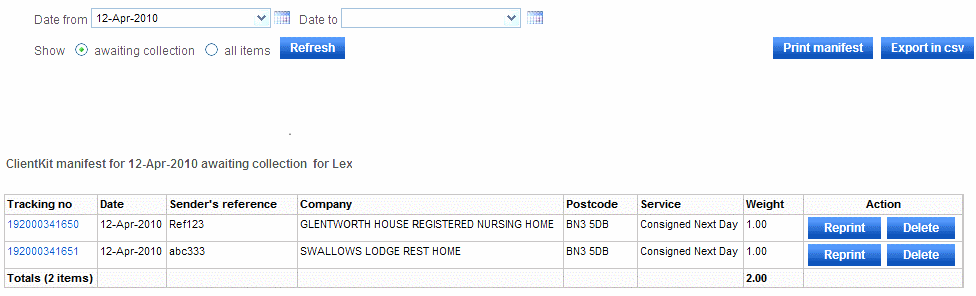
2. After you have selected Manifests, you will immediately see the prompts you will use to provide sufficient information about the shipments you want to include on the manifest
Date from
Date to
Show awaiting collection
Show all items
Before you provide that information, the system will display all the items with the current date that are awaiting collection. So if you are certain that these are the items to be collected, all you need to do is click the Print manifest button and follow the instructions to print the manifest. Those instructions are the normal ones associated with printing on your PC. However, we advise you to check the manifest on the screen before you print it, as once it has been printed, you will not be able to make any changes to the items on it.
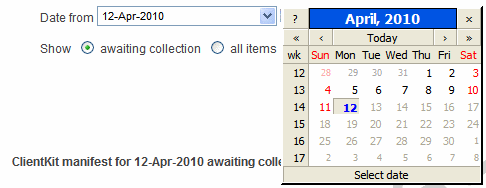
If you want to display items for a date or range of dates other than the current date, you can do this in one of two ways. You can select dates from the Date from and Date to drop down lists or you can click the date icons next to those prompts. Clicking a date icon will open up a calendar, defaulting to the current date. To display items for a specific date, simply select a Date from, leaving the Date to blank.
Please note that a Date from cannot be more than 75 days older than the current date. A Date to may be a future date if we have agreed that your organisation can make advanced bookings. The Date from and Date to drop down lists are limited to this date range. Dates outside this range in a calendar are non-selectable.
3. The number of columns, their titles and the information that you see displayed may be different from the example shown above. This will be because your organisation has asked us to change the information displayed to suit your way of working. By default, we will display items in tracking number then date order. If more than 10,000 items are displayed, only the first 10,000 will be in tracking number then date order; subsequent items will be in tracking number order only.
By clicking a column header, you can sort the manifest based on the data held in that column.
4. If you want to look at the detail of the item, click on the Tracking number that you are interested in. This will open a tracking pop-up window for the item where you can see the full delivery details. Please refer to the Tracking section for further guidance on this feature.
5. If an item has been cancelled and you do not want us to collect and deliver it for you, click the Delete button. This will remove it from the manifest. This feature is not available once you have printed the manifest.
6. If you have lost or spoilt the delivery label, you can reprint it by clicking the Reprint button. Please be aware that when you reprint a label, a new tracking number will be allocated to the item, so ensure that you destroy the original. This feature is not available once you have printed the manifest.
7. By changing the Date, you can select items booked on that date. You can also toggle between Show awaiting collection and Show all items. If you select Show all items, you will see both manifested and un-manifested items at the same time. In order to see the results of these selections on the screen, you will need to click the Refresh button.
8. For items that have been printed on a manifest, the Reprint and Delete buttons are disabled and not displayed.
9. At any time, you can click the Export in csv button and generate a csv file containing all the displayed items that you can then store locally on your PC. Once stored on your PC, you will be able to import the csv into a spreadsheet program such as Excel.